How to Enable and Disable WP_DEBUG in WordPress
When something breaks on your WordPress site — a white screen, a plugin conflict, or a theme error — the fastest way to find the cause is to turn on WP_DEBUG. This built-in WordPress debugging mode reveals the exact error message and the file it came from, so you can fix the problem instead of guessing. In this guide you will learn how to enable WP_DEBUG in WordPress, how to log errors to a file instead of displaying them on screen, and how to safely disable debugging before your site goes live.
What Is WP_DEBUG?
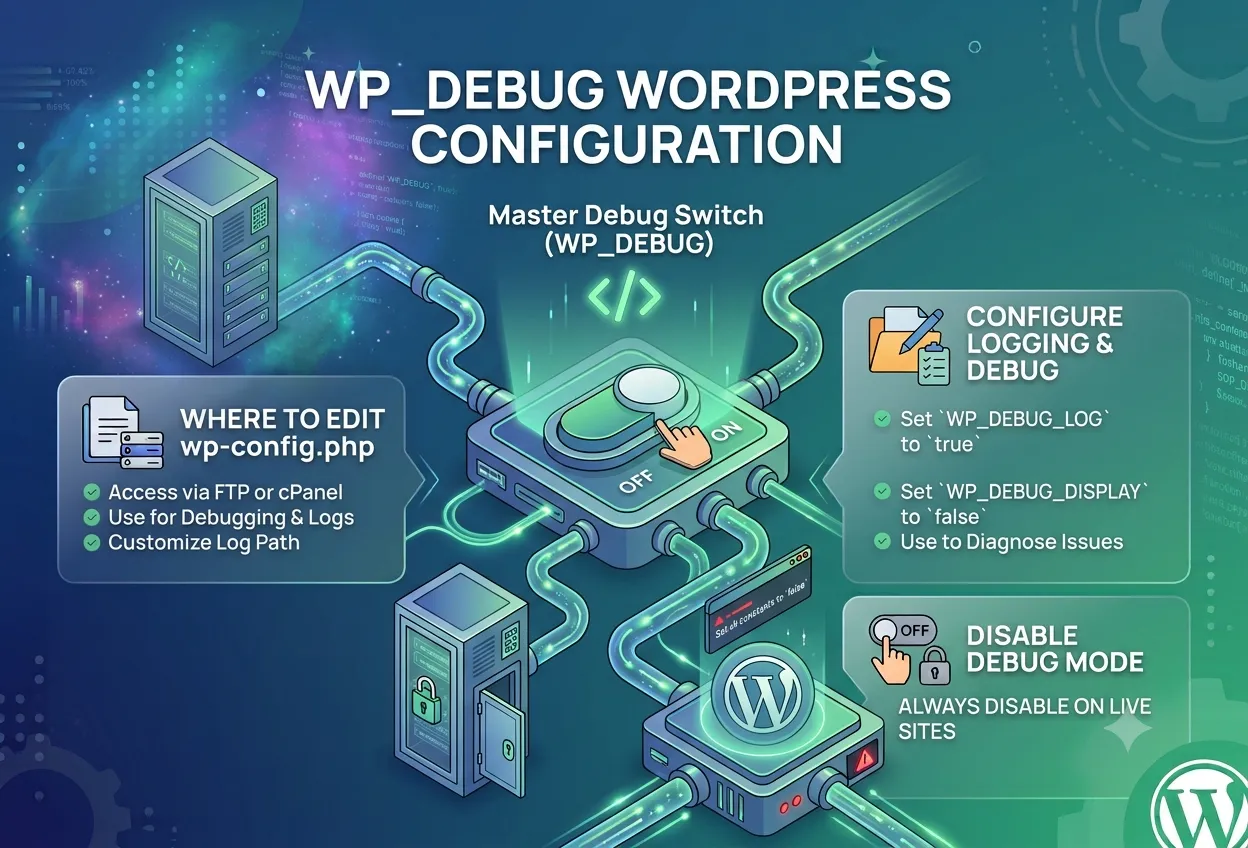
WP_DEBUG is a PHP constant defined in your site’s wp-config.php file. When it is set to true, WordPress stops hiding PHP notices, warnings, and errors and shows them directly — either on the page or in a log file. It is disabled by default on every WordPress installation to keep visitors from seeing raw error output.
Three constants work together for debugging:
WP_DEBUG— master switch that activates debug modeWP_DEBUG_LOG— saves errors towp-content/debug.loginstead of showing them on screenWP_DEBUG_DISPLAY— controls whether errors appear visually on the page (set tofalsewhen using the log)
Where to Find wp-config.php
The wp-config.php file sits in the root folder of your WordPress installation — the same directory that contains wp-admin/ and wp-content/. You can edit it via:
- FTP / SFTP — connect with FileZilla or your preferred client and open the file in a text editor
- cPanel File Manager — navigate to
public_html/(or your subdirectory), right-clickwp-config.php, and choose Edit - SSH —
nano wp-config.phpfrom your site root
Always make a backup of wp-config.php before editing it. A syntax error in this file will take down the entire site.
How to Enable WP_DEBUG in WordPress
Open wp-config.php and find this line near the bottom of the file:
define( 'WP_DEBUG', false );Change false to true:
define( 'WP_DEBUG', true );Save the file. WordPress will now display PHP errors, warnings, and notices directly on every page of your site. This is useful for a quick look, but not ideal if other people can see the site — move to the log-based approach below.
Log Errors to a File Instead of Showing Them on Screen
The recommended approach for debugging on a live or staging site is to write errors to a file. Add all three constants to wp-config.php:
define( 'WP_DEBUG', true );
define( 'WP_DEBUG_LOG', true );
define( 'WP_DEBUG_DISPLAY', false );
@ini_set( 'display_errors', 0 );
With this configuration:
- Errors are written to
wp-content/debug.log - Nothing is shown to visitors on the front end
- The
@ini_setline suppresses errors at the PHP level as a safety net
To read the log, open wp-content/debug.log in any text editor or tail it over SSH:
tail -f wp-content/debug.logCustom Log File Location (WordPress 5.1+)
Since WordPress 5.1 you can specify a custom path for the log file by passing a path string instead of true:
define( 'WP_DEBUG_LOG', '/home/youruser/private/debug.log' );This keeps the log outside the webroot and prevents it from being publicly accessible — a good practice on production environments.
How to Disable WP_DEBUG
When you have found and fixed the issue, always turn off debug mode before restoring normal traffic to the site. Set all constants back to false:
define( 'WP_DEBUG', false );
define( 'WP_DEBUG_LOG', false );
define( 'WP_DEBUG_DISPLAY', false );
Or simply revert wp-config.php to its original state with only:
define( 'WP_DEBUG', false );Leaving WP_DEBUG enabled on a production site is a security risk — error messages can expose file paths, database table names, and plugin/theme code to anyone who visits the site.
WP_DEBUG and WordPress Themes
If you are using a WebGeniusLab theme and something is not working as expected, enabling WP_DEBUG is the first diagnostic step we recommend. A PHP notice or deprecated function warning in the log will immediately point to the file and line number causing the problem.
Common things WP_DEBUG reveals in theme environments:
- A required plugin is deactivated (undefined function errors)
- A PHP version incompatibility (deprecated function warnings)
- A missing file referenced by a child theme
- A memory exhaustion error that caused a blank page
Once you have the error from the log, you can include it in a support ticket and our team will diagnose it much faster.
Quick Reference
| Constant | Value | Effect |
|---|---|---|
WP_DEBUG |
true |
Enables debug mode |
WP_DEBUG |
false |
Disables debug mode (default) |
WP_DEBUG_LOG |
true |
Writes errors to wp-content/debug.log |
WP_DEBUG_DISPLAY |
false |
Hides errors from the page output |
Summary
Enabling WP_DEBUG in WordPress takes one line in wp-config.php. For production sites, combine it with WP_DEBUG_LOG and WP_DEBUG_DISPLAY = false so errors are captured silently in a log file. Always disable debug mode once you are done — leaving it on exposes internal details about your site to the public. With the error in hand, fixing the problem (or reporting it to a theme or plugin author) becomes straightforward.